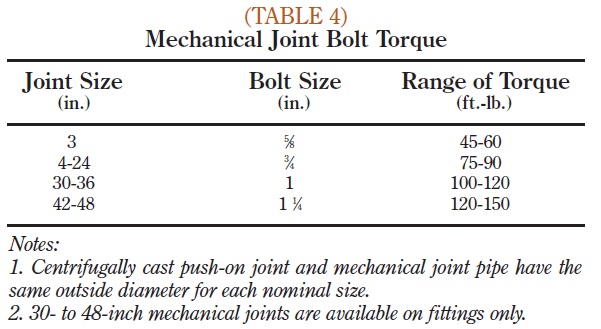
These are pipe installation instructions. I have posted the portion regarding the joining of flanges. Note the “torque” requirements.
- Wipe clean the socket and the plain end. Brush both the gasket and plain end with soapy water or an approved push-on joint lubricant meeting the requirements of ANSI/AWWA C111/A21.11 immediately before slipping the gasket onto the plain end for joint assembly. (Note: Lubrication is recommended for proper assembly of all mechanical joints.) Place the gland on the plain end with the lip extension toward the plain end, followed by the gasket with the narrow edge of the gasket toward the plain end. Note: In cold weather, it is preferable to warm the gasket to facilitate assembly of the joint.
- Insert the plain end into the socket and press the gasket firmly and evenly into the gasket recess. Keep the joint straight during assembly.
- Push the gland toward the socket and center it around the plain end with the gland lip against the gasket. Insert bolts and hand tighten nuts. Make deflection after joint assembly but before tightening bolts.
- Tighten the bolts to the normal range of bolt torque (as indicated in the table below) while constantly maintaining approximately the same distance between the gland and the face of the flange at all points around the socket. This consistency can be accomplished by partially tightening the bottom bolt first, then the top bolt, then the bolts at either side, and finally the remaining bolts. Repeat the process until all bolts are within the appropriate range of torque. In large sizes (30-inch through 48-inch), five or more repetitions may be required. Joints that have been assembled without proper lubrication and/or inadequate bolt torque are susceptible to leakage.